Photobucket Photobucket Photobucket Photobucket Photobucket

martes, 28 de febrero de 2012

Liebster Blog Award

Handmade by Is está de enhorabuena, ha recibido no uno sino DOS Premios Liebster Blog!! No me veis pero estoy haciendo mi baile feliz...
Se trata de un premio para ayudar a los blogs que acaban de empezar o tienen menos de 200 seguidores a que sean más conocidos.
Gracias a Nancy de Life: Designed y a Lucia de FondoBluDesign by Lucia Barabas por concedérmelo.

Handmade by Is has reasons to celebrate, it has received not one but TWO Liebster Blog Awards!! You can't see me right now but I'm doing my happy dance...
The Liebster award is granted to new bloggers with less than 200 followers, by a blogger who is a fan of your workThe idea is to spread the love from one small blog to other small blogs. This helps to spread knowledge and readership.
Thanks to Nancy of Life: Designed and to Lucia of  FondoBlueDesign by Lucia Barabas to give it to me.

Una vez recibido el premio, si quieres aceptarlo, debes:
- Crear un post con el premio en tu blog.
- Añadir en tu post un enlace al blog que te lo otorgó.
- Agradecerle en un comentario que haya pensado en ti.
- Elegir cinco blogs para darles el premio.
- Y enviar un comentario a cada uno de ellos para que sepan que se lo has otorgado.

To accept the award, you must:
Post the award on your blog.
- Link back to the blogger who shared the award.
- Thank the said blogger who awarded it to you.
- Pick 5 other blogs you want to recognize.
- Visit the 5 bloggers and let them know that they receive the award.


Mis elegidos son... y no ha sido fácil:
It's hard to pick just five, but here we go!


Here's to Handy Andy


lunes, 27 de febrero de 2012

Palo para el pelo


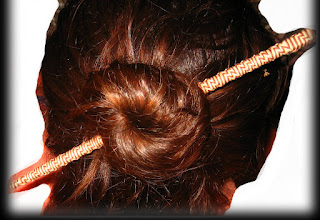
Le he cogido el gusto a transformar cosas enrollándolas con diferentes materiales, así este palillo chino se ha convertido con un poco de tiempo y algo de hilo de bordar en ... un palo para el pelo! Es chulo o no? Hasta aquí lo bueno, proyecto fácil, rápido y muuy barato, ahora lo malo... mis fotos, lo sé, dan pena pero mi móvil no da para más y era lo único que tenía a mano cuando lo hice, además he hecho también un vídeo y aunque parezca mentira es todavía peor!!! En fin, he añadido un dibujo (como veréis dibujar no es lo mío) y yo creo que entre todo quedará claro cómo se hace, y si no no dudéis en preguntar!


I've taken a liking to transform things by wrapping them with different materials, so this chopstick has become a hair stick! Is it cool or what? The good news: it's an easy, fast and really cheap project, now the bad news... the pictures, I know they're terrible but it's the best my phone can do and it was the only thing I had when I made it, besides I made a video and although it's hardly to believe it's even worse!!! Ah well, I've added a drawing (as you can see drawing is not my thing) but I think that you'll understand how to do it and if you don't please ask me!


  Materiales:
Palillo chino
Hilos de bordar en dos colores que contrasten
Bloque de corcho blanco
Pegamento.

Materials:
Chopstick
Embroidery floss two different colors
White foam
Glue

Modo de hacerlo:
1. Clava el palillo en el corcho para que se sujete y puedas trabajar.
2. Pega el extremo de tus hilos en la parte superior del palillo. En mi caso el marrón a la izquierda y el beige a la derecha.

1. Stick the chopstick into the white foam so you can work.
2. Glue your floss to the top of the chopstick. I put brown in the left and beige in the right .


3. Haz un nudo de la siguiente forma: coge el hilo marrón y pásalo por detrás del palillo dejando un hueco. 
4. Coge el hilo beige y pasándolo por detrás del hilo marrón, crúzalo por delante del palillo y mételo por el hueco que has dejado con el hilo marrón.

3. Make a knot following these steps: take the brown floss and cross it behind the chopstick making a loop.
4. Take the beige floss and cross it behind the brown one, then pass it through the loop you just made with the brown floss.


5. Estira de ambos hilos y ya tendrás formado la primera fila.
6. Ahora el hilo beige estará en la izquierda. Repite todo el proceso con el hilo beige.
7. Cuando llegues al final pega los hilos en la punta del palillo y YA ESTÁ!

5. Pull them out and you have already made the first row.
6. Now the beige floss is in the left. Repit the whole process with it.
7. When you reach the end of the chopstick, glue the floss to it and YOU'RE DONE!

Por si os ayuda el dibujo...
Maybe the drawing will help...


Os dejo el vídeo aunque quedáis avisados de lo horrible que es... lo único bueno la música Blue Bossa de John Coltrane. 
Here is the video, I've already told you it's awful... the only thing good is the music Blue Bossa by John Coltrane.


Visto de cerca
A closer view


Y aquí está como queda puesto en el pelo.
And here it is on the hair.


Parties:
See the sidebar


martes, 21 de febrero de 2012

Marco de cáñamo


Ya sé que estaréis pensando... otro marco! No sé que tengo con los marcos que me encantan! Últimamente he visto un montón de letras enrolladas con cáñamo así que pensé y por qué no un marco? y aquí está. Como siempre es fácil de hacer y barato, manos a la obra!
I know what you are thinking now... another frame! I don't know why but I have a thing for frames, I love them! I've seen lately a lot of letters wrapped with hemp so I thought, why not a frame? And here it is. It's, as always, a simple and cheap project, let's get down to work.


Materiales:
Cartón 3 piezas
Cáñamo
Cutter
Cola blanca


Supplies:
Cardboard 3 pieces
Hemp
X-ACTO knife
Glue


Modo de hacerlo:
1. Cortar el cartón (las 3 piezas) de las medidas que quieras (el mío mide 22 x 22 cm aprox.).
1. Cut the carboard the size you want your frame to be (mine is 22 x 22 cm more or less).


2. Pegar las tres piezas para que nos quede un marco de cierto grosor.
2. Glue the three pieces so we can have a thick frame.

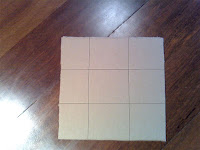
3. Trazar 4 líneas con un lápiz en el cartón superior y formar una cuadrícula de 9 cuadros iguales.
3. Draw 4 lines with a pencil on the carboard and create a grid with 9 equal squares.


4. Cortar el cuadro central que será donde irá la foto.
4. Trim the central square off , here we will put the picture.


5. Enrollar y enrollar y enrollar el cáñamo.
5. Wrap and wrap and then wrap a little more the hemp.


Primero por los bordes.
 First the edges.


Luego seguir por la parte superior e inferior de forma horizontal.
Then the upper and lower part of the frame horizontally.


Continuar por los laterales de forma vertical.
After that, the sides, vertically.


Y por último, enrollar por la parte central de forma horizontal.
And last, wrap the central part horizontally again


Creo que la explicación no ha quedado muy clara pero espero que con las fotos se entienda. Aquí he puesto el orden en el que tenéis que enrollar.

I think that the explanation is a bit confusing but I hope that the pictures make it clear. Here you have the order you  must follow to wrap the frame.


Ya sólo queda colocar una foto que nos guste y situarlo en algún sitio que se vea mucho! :) Yo todavía no he decidido si colgarlo en la pared o ponerlo en la estantería...
El marco me costó un par de noches de hacer (mientras veía la tele) pero ha merecido el esfuerzo!

Espero que os haya gustado y que lo hagáis!

The only thing you have left is find a great picture, and place the frame in the spotlight of your house :) I haven't decided yet if I'll hang it or if I'll place it on the shelf...
This project was a little time consuming, I made it while I watched the tv but it was worth it!

I hope you liked it and that you make it!


Parties:
See the sidebar

lunes, 13 de febrero de 2012

Colgantes con arandelas


Últimamente he visto en Internet muchos colgantes hechos con arandelas así que me he animado y he hecho estos tres, dos colgantes y una pulsera. La verdad es que se hacen en un momento y quedan muy chulos. Más de una persona me ha preguntado donde los había comprado. Me encantan!

La forma de hacerlos es muy sencilla, aquí os dejo el paso a paso.

Materiales:
Arandelas metálicas.
Papel de scrapbook
Tijeras
Glossy Accent o algún pegamento tridimensional.
Cinta de cuero, cadena, hilo de bordar..
Adornos 

1. Dibuja el contorno de tu arandela sobre el papel que te guste y recórtalo. (lima un poco los bordes si no eres muy buena cortando como me pasa a mí)
2. Pon un poco de Glossy Accent y pega el papel sobre la arandela.
3. Pon una  capa de Glossy Accent sobre el papel para conseguir ese efecto como cerámico. Deja que se seque sobre una superficie plana durante un par de horas.
4. Pasa tu cinta, cuero o lo que te apetezca por el agujero y voilà, ya tienes tu colgante!. Yo he añadido unas cuentas que tenía de un collar viejo en el caso de la pulsera, y en el colgante de florecitas unas piezas metálicas que había quitado de un pantalón. Y lo mejor, coste 0!


Lately I've seen on the Internet many washers pendants, so I've tried to make some myself and here they are, two pendants and one bracelet. They take very little time to make and they turn out great. I've been asked where I had bought them. I love them!
The how to is very simple.

Here are the supplies you'll need:
Washers
Scrapbook paper
Scissors
Glossy Accent or any dimensional glue
Leather cord, chain, embroidery floss... 
Embellishments

1. Draw the silhouette of the washer on your paper and trim it. (sand the edges a bit if you're as bad as I am when it comes to trimming)
2. Put Glossy Accent on the washer and glue the paper on.
3. Add Glossy Accent on the paper to get the ceramic look. Let it on a flat surface for a couple of hours to dry.
4. Insert your cord, floss, chain and voilà! you've made a pendant! I added some beads to the bracelet and two metallic pieces to one of the pendants. And the best part, 0 cost!


Parties: